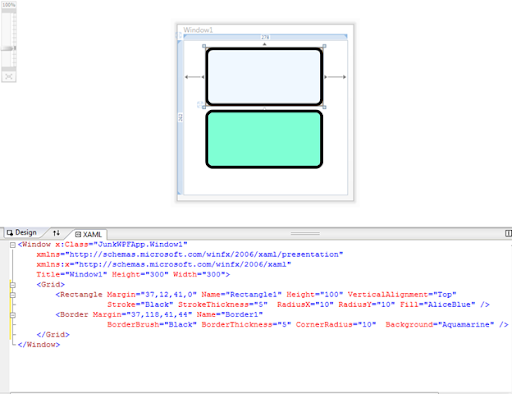
So here we are, a rectangle and a border with curved corners. Hmmm, what are the differences between them? Why different property names and API? Maybe I am too dumb to discover. Can someone please let me know?
So here we are, a rectangle and a border with curved corners. Hmmm, what are the differences between them? Why different property names and API? Maybe I am too dumb to discover. Can someone please let me know?
Still haven't be able to created the memory leak problem.
I have implemented simple drag and drop from one ListBox to another ListBox onto my memory leak test project. The power of WPF, all I did was create an adorner for visualising drag and drop, and remove/add object from/to the data binding sources.
By the way, no guarantee to be bug-free because implementing drag and drop logic was not my intention. I am trying to find out the memory leak problem!
Anyway, let me note some key points:
1. A Canvas encapsulating the ListBoxes (in ShapeListCollectionControl.xaml)
<Canvas HorizontalAlignment="Stretch" VerticalAlignment="Stretch" Name="TestCanvas"
  DragOver="TestCanvas_DragOver">
    <ListBox Width="300" Margin="0,0,0,0" Name="TestListBox"
 PreviewMouseLeftButtonDown="TestListBox_PreviewMouseLeftButtonDown"
           AllowDrop="True" Drop="TestListBox_Drop"
 GiveFeedback="TestListBox_GiveFeedback">
      <ListBox.ItemTemplate>
          <DataTemplate>
              <main:ShapeListControl ListID="{Binding Path=ListID}"
  HorizontalContentAlignment="Stretch" VerticalContentAlignment="Stretch" />
          </DataTemplate>
      </ListBox.ItemTemplate>
  </ListBox>
</Canvas>
Don't worry about the event handlers yet. Having a canvas as a wrapper allow you to add adorner to the canvas when you start dragging.
2. Start dragging - TestListBox_PreviewMouseLeftButtonDown (in ShapeListCollectionControl.xaml.cs)
Note that I didn't write the GetObjectDataFromPoint method, I didn't even find it. All I have done was made it into an extension method.
Anyway. So the PreviewMouseLeftButtonDown event handler does the following:
i. Find out what has been dragged
ii. Find out the object list
iii. Set the selected shape
iv. Create Adorner and add to the canvas
v. Remember the offset positions
vi. Start dragging
3. Dragging - TestCanvas_DragOver
Note that here I am dragging the adorner, NOT the actual control. And it is in the canvas, not the ListBox!
4. Dropping - TestCanvas_Drop
To drop the selected shape, find the ShapeList by drop position. In the data model, remove the shape from the list we drag from and add to the list we drop to. After that remove adorner and reset selection.
object data = TestListBox.GetObjectDataFromPoint(position);

if (!(data is ShapeList))
{
  RemoveAdorner();
  return;
}

ShapeList list = data as ShapeList;

// Change Data
if (Manager.FromList != null)
{
  Shape s = Manager.SelectedShapeControl.Shape;
  Manager.FromList.Remove(s);
  list.Add(s);
}

To use your own user control, remember to import namespace:
xmlns:main="clr-namespace:TestMemoryLeak"
Then you can use your control:
<Canvas HorizontalAlignment="Stretch" VerticalAlignment="Stretch">
    <ListBox Width="300" Margin="0,0,0,0" Name="TestListBox">
        <ListBox.ItemTemplate>
            <DataTemplate>
                <main:ShapeListControl ListID="{Binding Path=ListID}" />
            </DataTemplate>
        </ListBox.ItemTemplate>
    </ListBox>
</Canvas>
Simple. <Rectangle /> cannot have curved corner.* If you want a curved corner filled rectangle, use <Border />.
Example:
<Border x:Name="ShapeBorder" Height="25" Background="Aqua" CornerRadius="3"
 BorderThickness="1" BorderBrush="Black" />
The key attributes is CornerRadius! :)

* Ivan told me that, actually you can! Check out the RadiusX and RadiusY properties!

